How To Make Website For Free: The Ultimate Guide
Today’s technology allows regular people to build their site with very little or no programming knowledge at all. In this article, I will show you how to create a professional website with minimal costs, just like this attorney website.
So let’s get started!

The Steps

Why Twitter is Important for Your Business
STEP 1
Choose a Domain Name

STEP 2
Choose a Hosting Account

STEP 3
Install WordPress

STEP 4
Choose a Theme or Template

STEP 5
Keyword Research

STEP 6
Install SEO Plugin

STEP 7
Know Your Sitemap URL

STEP 8
Install Google Analytics

STEP 9
Add your website to Google Search Console

STEP 10
Submit Sitemap to Google
Step 1: Choose a Domain Name
Here is my opinion when choosing a domain name:
Your domain name has to be short: Domains with short characters are better than domains with long characters. The reason is that it’s easier to remember. You don’t want people to misspell your domain name when they try to come back to your site.
Short domain names are also brandable. If you’re running a business you want to have the right brand name for your product and service.
Also if possible, always choose a .com domain name or if you’re a non profit organization go with a .org domain names. Stay away from .info and even .net domains. If you’re creating a personal website it is okay to use www.yourfullname.com
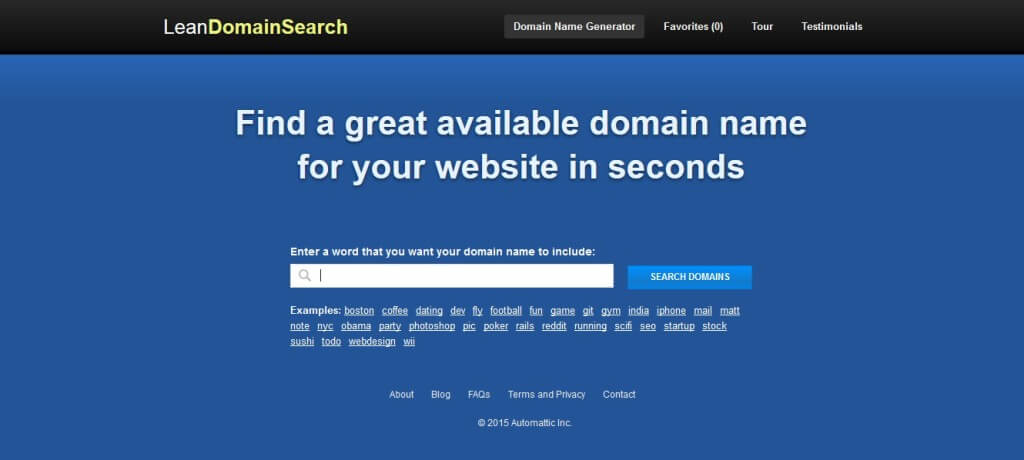
A very useful tool to search for available domain names: https://leandomainsearch.com
Go to Lean Domain Search and put in a single keyword that best describes your website in the search bar and look for a short domain that you like.
The reason why I suggest you go with Go Daddy is because of their customer support. Some people are anti-GoDaddy but I think they’re okay for buying domain names. If you’re like me, you probably prefer to talk with a real person when having questions about your domains. Go Daddy has 24/7 customer support, so it’s easy for your to contact them and ask questions.
Another alternative for domain registration is https://www.namecheap.com however they don’t have phone support.
TIP: After you register your domain name, go ahead and register Facebook/Twitter/Pinterest, etc to secure your brand name. These social media sites have millions of visitors at any given time so it’s a no-brainer to share your content there.
Next, you will have to choose a hosting account to store your website files. Go Daddy offers hosting but I don’t recommend using Go Daddy’s hosting because they’re slow and they don’t include free email addresses for your new website. Go Daddy is okay to buy domain names because they have a great support department.
If you plan to purchase more than 10 domain names for your business, Go Daddy has a domain discount club that allows its members to purchase domain names at $8/year each.
Important notes when choosing a domain name:

- Choose a domain that is short or brandable
- Always go for .com extension (or a .org if you’re a non profit organization)
- Use Lean Domain Search to browse domain name suggestions
Step 2: Choose a Hosting Account
One of the reasons why most people create a website is to provide information that is accessible 24 hours a day 7 days a week. So you want to make sure your hosting account is very reliable.
Another thing about free hosting is most of them force you to display an advertisement on your website, so it doesn’t look very professional.
Hosting is cheap and affordable — a huge plus.
The types of web-hosting you need to know:

Important notes when choosing a web hosting account:
- Know the difference between “shared” and “dedicated” hosting
- Start with an affordable shared hosting plan like Bluehost or Siteground
- Server speed is an important factor when deciding which web hosting to choose
Important notes when choosing a web hosting account:
- Know the difference between “shared” and “dedicated” hosting
- Start with an affordable shared hosting plan like Bluehost or Siteground
- Server speed is an important factor when deciding which web hosting to choose
Like I said before, most websites are okay with this option. If you’re a beginner and working on your first website, shared hosting is the option you want. Usually, shared hosting has a capped number of visits you can have at one time. But don’t worry, if you don’t have thousands of visitors at one time you should be okay.
Note: You can have a million visitors a day as long as they don’t visit your site all at once.
Dedicated hosting: This hosting environment is for big websites with millions of visitors per day. If you have massive traffic (I’m talking about millions of people visiting your website at one time), this is the hosting you want. As you can tell from the name, this server environment is dedicated to your website. You don’t share the space and resource with any other websites and you can tweak your hosting settings as you like for maximum website performance. This type of hosting is much more expensive but if you have massive traffic then a hosting fee should not be an issue.
Here are the two hosting companies that you can choose based on your budget:
They are very reliable and you can host as many domain names as you want. Also they have a 24/7 phone support so you can call them any time if you have problems with your site. If you’re planning to have more than one websites in the future then Bluehost is the way to go.
Bluehost also gives you free unlimited email accounts. So you can have multiple email addresses using your domain, like info@formalsite.com with unlimited space. They also offer shared and dedicated hosting so it’s easy for you to upgrade when you do have lots of visitors. But again, if this is your first website then go with shared hosting.
These guys are a bit expensive but they have excellent feedback. They specialize in WordPress hosting which is what we’re going to be using to manage our website (more on this on step 3).
The good thing about them is that they are one of the fastest shared hosts for WordPress websites. And fast page loading speed is good for you.
Many studies reveal most people would only wait 5 seconds for your website to load, so you want your website to load very fast. Here is an article by KissMetrics about why page loading speed is essential.
Important notes when installing WordPress:
- WordPress is a great website platform and best of all it’s free
- Use “One-Click-Install” feature that is available on most hosting plan
- Call the hosting support team if you still have any problem
Step 3: Install WordPress
If you choose Bluehost or WP Engine from step 2, there should be a button that says “Install WordPress” in your control panel.
First, login to your Bluehost account and find the button that says “Install WordPress”
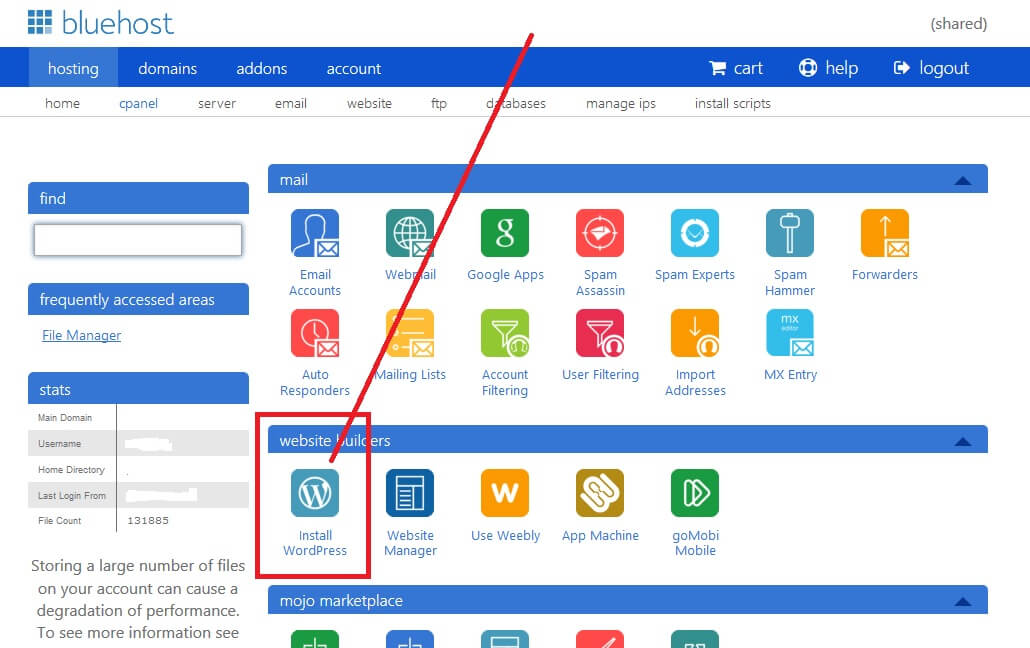
Or you can choose one icon below it under “MOJO MARKETPLACE” called “One-Click Install”
It’s the same thing. Here’s a video tutorial from Bluehost on How To Install WordPress:
Make sure you choose “WordPress” in the category like this:
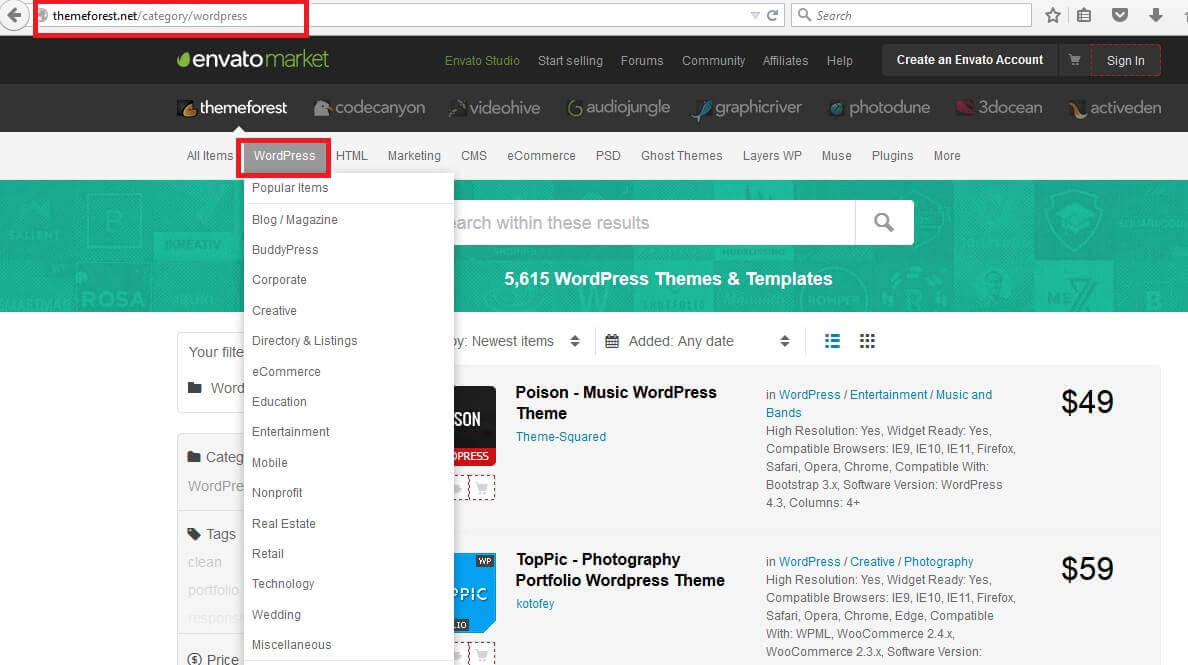
Once you’re in the WordPress category section you can enter keywords or search by category within WordPress.
When you see a theme that you like go ahead and test the page loading speed by doing this:
- Click on Live Preview of the theme
- Click “Remove Frame” from top right when you’re previewing the theme
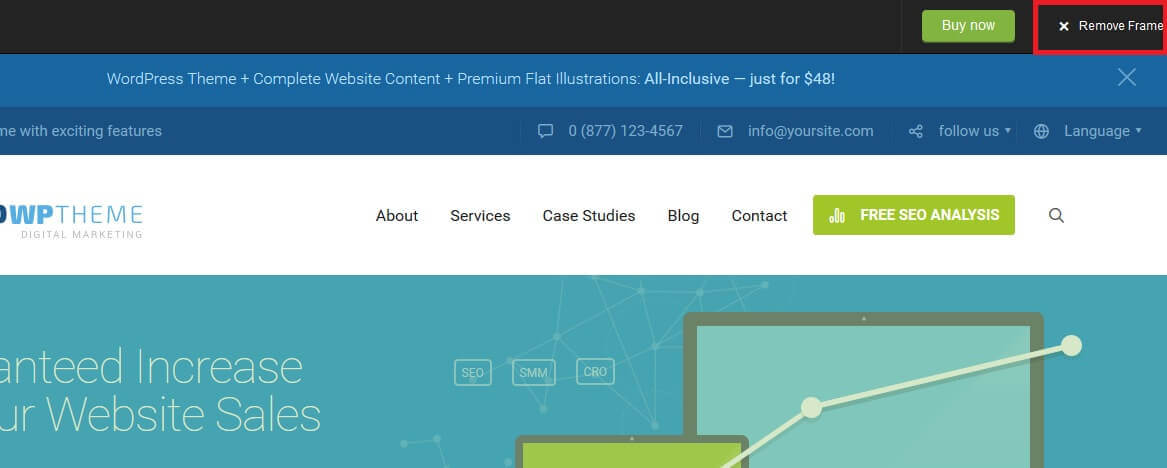
Once the frame is removed COPY the URL from your browser and we’re going to test the speed at 3 different places:
Is a website that will tell you how fast/slow your loading speed is. So before you buy a theme, you must remove the frame from Themeforest and then check the speed on GT Metrix.

You see on this example the Performance Scores are A’s and Page Load Time is 2.5 seconds.
Is another place to check page load speed. Similar to GT Metrix, Pingdom Tool also gives you an idea of how fast/slow a website loads.
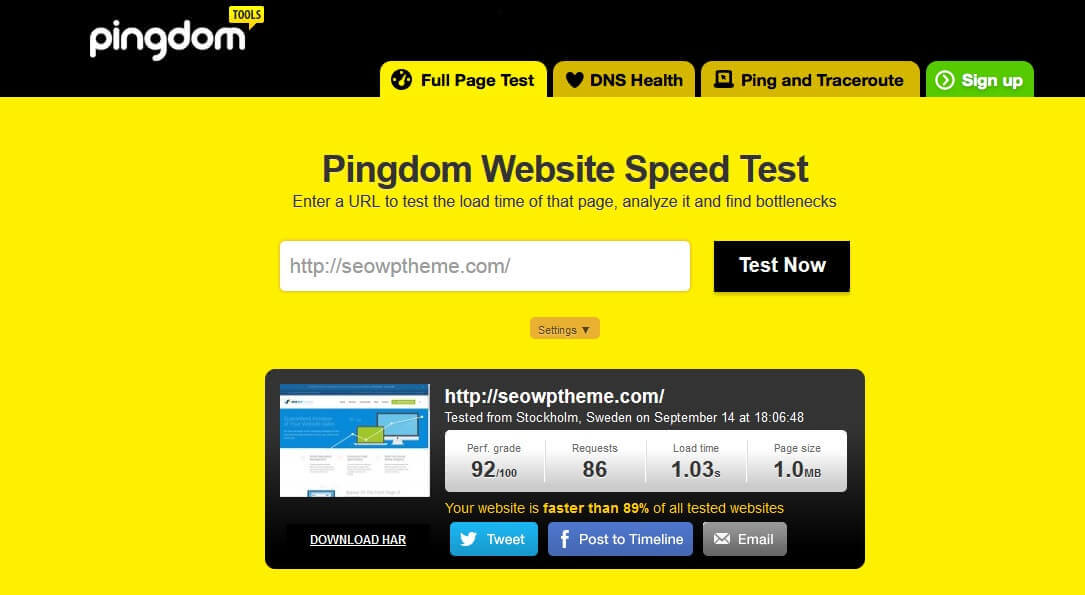
Even though the results from both sites are different but they should be close enough. If you see a theme that loads below 5 seconds on both tests, it’s a good theme.
The last test is we want to make sure the theme is mobile friendly. Click here to Google Webmaster tool to check if the theme is mobile-friendly or not. Most newer WordPress themes are mobile-friendly but it only takes 1 minute to check so it doesn’t hurt.
Another place to look for fast loading themes is called Studio Press (https://studiopress.com). All of the themes on Studio Press load quickly.
Once you purchase the theme you like go ahead and upload it to your website. Check the video guide below by a friend of mine from WP Learning Lab on how to install your new WordPress theme:
Important notes when choosing a WordPress template:
- Design and speed are two most important factors
- Buy theme on WordPress theme marketplaces like Theme Forest
- Check loading speed using GT Metrix or Pingdom
Step 4: Choose a Theme
There are several places you can visit when browsing for your WordPress theme or template. If you do a Google search for “Wordpress themes” or “Wordpress templates” it will give you plenty of options.
However, I don’t recommend using a free template for your website. Why? Because free templates are prone to viruses and malware files that might be planted with the purpose of hacking your computer. Especially the ones that you download for free from some random websites.
Several things to look at when choosing a WordPress template are:
The design itself. The template must be something that fits your website purpose. Think about how many pages and how much content you’ll have.
The loading speed. Since most people on Earth are using Google as their preferred search engine, we must follow what Google wants so our site can rank high on the internet. And one of the things that Google takes into consideration is your website loading speed.
Also like I said before, most people would only wait 5 seconds for your website to load before they leave so you want to keep your page loading speed within 5 seconds. The faster the better.
Okay. So now you know it’s not only about the design. But speed is also important. It is time to search for your website’s template.
Step 5: Keyword Research
Update: Nowadays, I use Ahrefs to do keyword research.
When doing your keyword research you want to find what we call “Long-tail keywords.” They are keywords that consist 3 or more words. For example: Cheap gaming laptop, Make your own iPhone case, Best electric guitar for beginners, Gold necklaces for women, Cardigan sweaters for men, and so on.
The benefits of targeting long tail keywords are: long-tail keywords are much more specific and usually used late in buying decision. They’re also easier to rank as opposed to short-tail keywords.
Short-tail keywords almost always have a minimum of hundreds of thousands of competitions. It is very difficult to rank for these keywords especially if you’re a beginner.
There are 3 rules that I follow when choosing a keyword for a website or an article:
- No less than 750 searches a month
- No more than 50,000 exact competition
- No authority sites on the first page results (if you don’t know what this means, don’t worry. Just continue reading).
These are the basic rules that I follow. If you follow these rules you’ll end up with great long-tail keywords that will bring good amount of traffic to your website consistently
First, before you start doing keyword research for your website, you need a tool called “MOZ Bar” and you can download it for free here: Download MOZ Bar (for Chrome and Firefox). This tool is critical to do research on your competition.
With MOZ Bar you can quickly determine if there are a lot of authority websites for the keywords you’re targeting. Authority websites are difficult to outrank especially if your website is new or if you are inexperienced in SEO.
Once you download and have it on your browser, we’re ready to move on.
– Go to Google Keyword planner. Just search Google Keyword Planner on Google or go directly to the URL: https://adwords.google.com/KeywordPlanner
Note: Google requires you to register and enter in billing info but don’t worry you won’t be charged anything for using the Keyword Planner.
– After you login to your account you’ll see a screen like this:
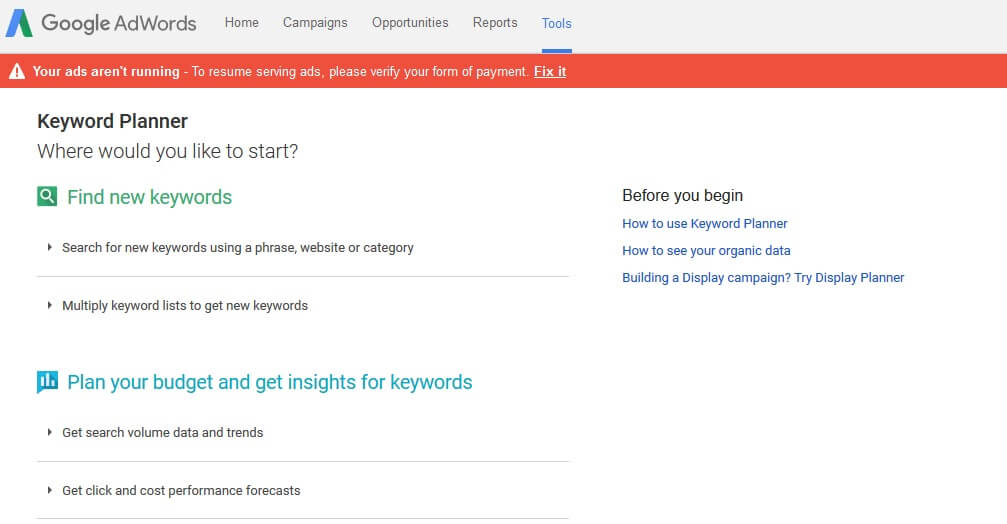
– Click on “Search for new keywords using a phrase, website or category. You’ll see a screen like this:

On this screen you can go ahead and enter in your main keyword. Your main keyword should be one or two-word keyword just like the example above. Then you want to set your keyword filters of average monthly searches to more than 750 and click on “Get Ideas”
– After you click on “Get Ideas” you’ll see a screen like this:
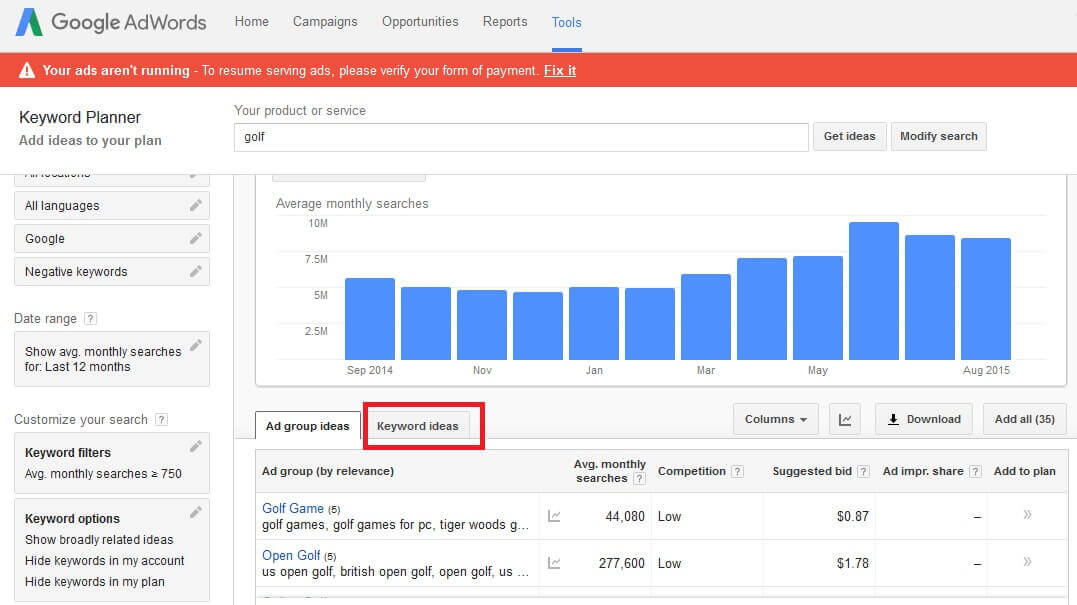
On this screen you want to click on “Keyword ideas” just like the screenshot above.
– After you click on “Keyword ideas” go ahead and sort the keywords by the “Average monthly searches” just like this:
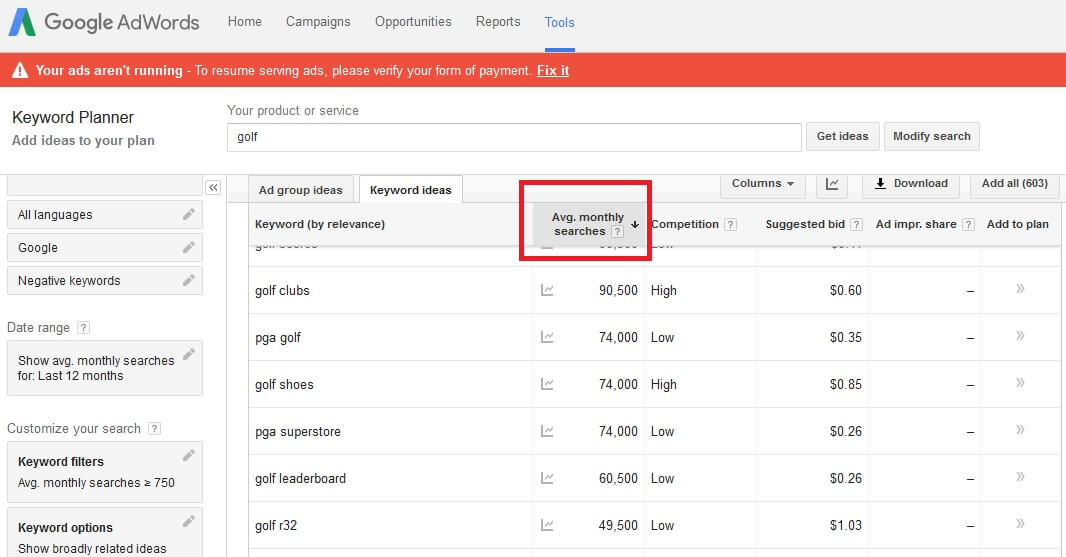
Once you’ve done the steps above it’s time search the keywords that meet our 3 criteria we discuss before.
Note: All of these keywords have at least 750 average monthly searches so all of these keywords meet our first criterion.
Now it’s time to check the second criterion which is “No more than 50,000 exact competition.” Go to Google and search each keyword by using the quotation marks and see the results just like this:
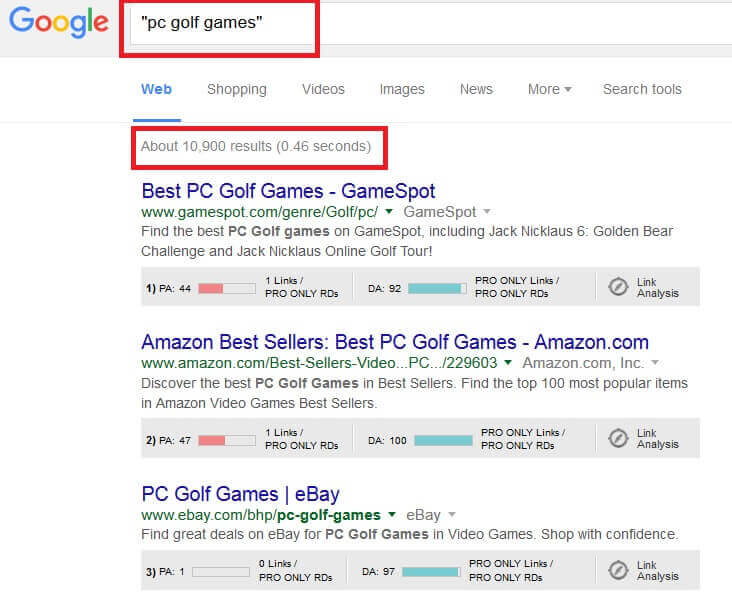
The keyword PC Golf Games have exact competition of 10,900 websites. It meets 2 of our criteria: no less than 750 average searches a month and no more than 50,000 exact competition on Google.
The last thing you want to do is check your real competition to see if there’s any authority websites in top 10 results. The way to do it is by searching the keyword again, but this time DO NOT use the quotation mark. Just like this:
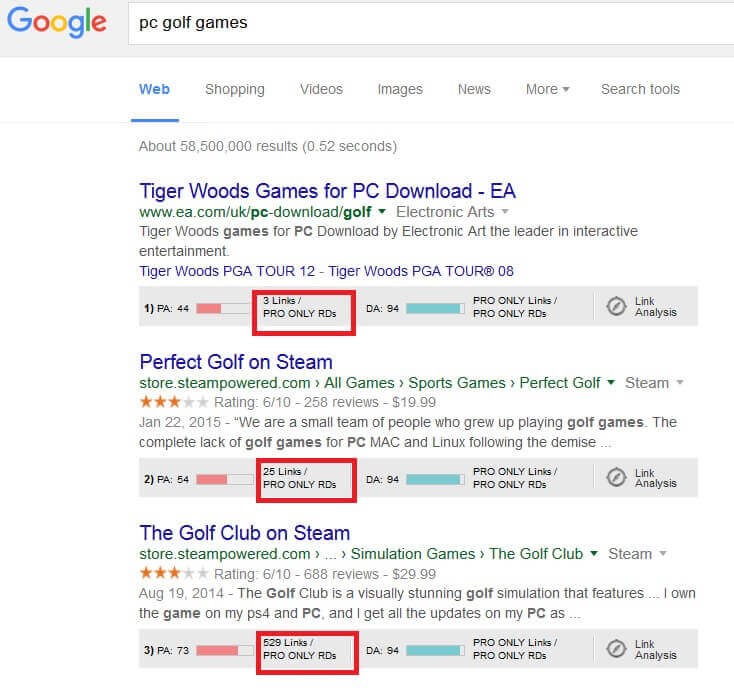
Now, I want you to pay attention to your MOZ Bar. I want you to see the number of links that the top 10 results have. In this example, the first result only have three links. The second has 25 links and the third result has 529 links. The fewer links that your top 10 competitions have, the better.
The fact that the first result only have three links is a great sign for us.
Let’s compare to something that’s a lot more competitive:
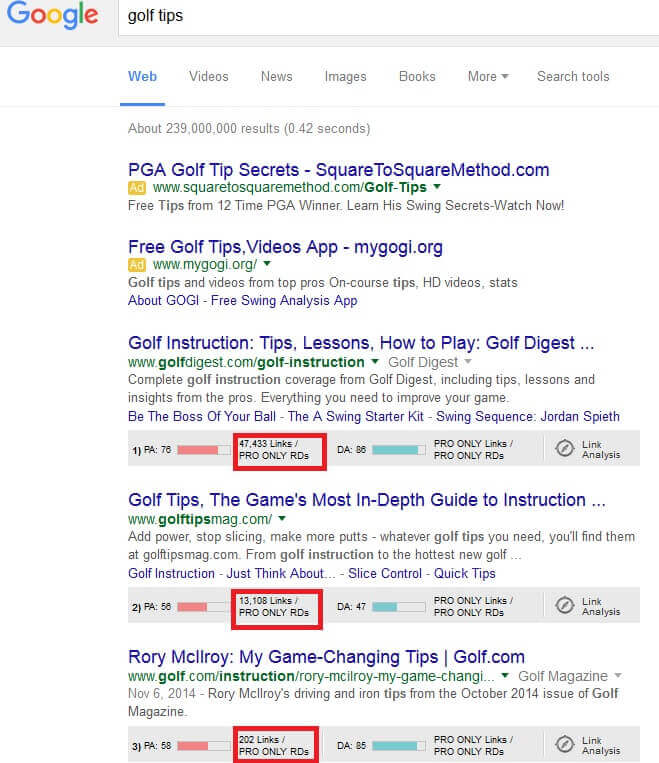
You see, I’m checking the keyword “Golf Tips” without the quotation mark. The top results have tens of thousands of links. This is a very competitive keyword.
The top results (GolfDigest.com, GolfTipsMag.com, and Golf.com) are authority websites. It’s difficult to outrank them quickly.
What you want to see is very few links on the top 10 results when you search the keyword without quotation marks.
If you find a keyword that has more than 750 average monthly searches, no more than 50,000 exact competition (with quotation marks), and no authority websites in top 10 (without quotation marks, few links), you’ve found a great keyword for your new website.
Note: Please don’t be lazy on your keyword research process. You must check the keywords from Google planner one by one to find good keywords with decent number of searches and weak competitions. You won’t find weak competitions if the keywords has 5,000+ searches a month.
When checking your keywords one by one from Google planner, you might want to skip keywords that have 5,000+ keywords to save time.
Other tools to use:
Ubersuggest.org. This is an excellent website to find long-tail keywords. Enter in the keywords you find on Ubersuggest into Google Keyword Planner and click on “Keyword ideas”
Keywordtool.io. This is also a good keyword tool that I often use to find long-tail keywords. Enter in the keywords you find on Keywordtool.io into Google Keyword Planner and click on the “Keyword ideas” tab.
Google’s related search. When you search a keyword on Google on the bottom of the page they give you “related searches” like these:
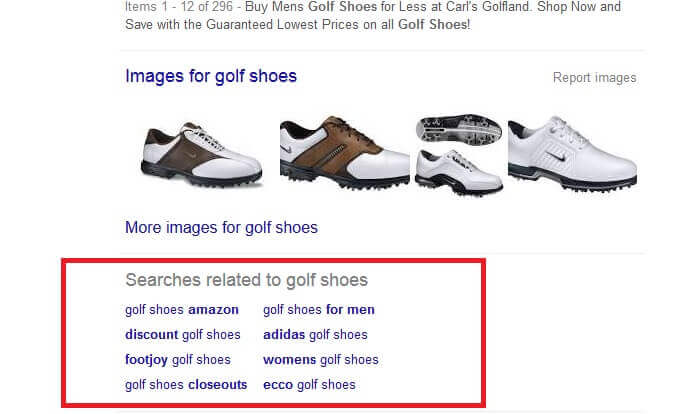
Again, enter the keywords into Google Keyword planner and click on “Keyword ideas” just like you did before.
More reading about Keyword Research: The Definitive Guide of Keyword Research by Backlinko.
Important notes when doing keyword research:
- Use paid SEO tools like Ahrefs or SEMrush for best results
- Look for long tail keywords with more than 500 searches per month and no more than 50,000 exact competition
- Use MOZ toolbar to assess top 10 competitions (look for keywords with few authority sites in top 10)
Step 6: Install SEO plugin
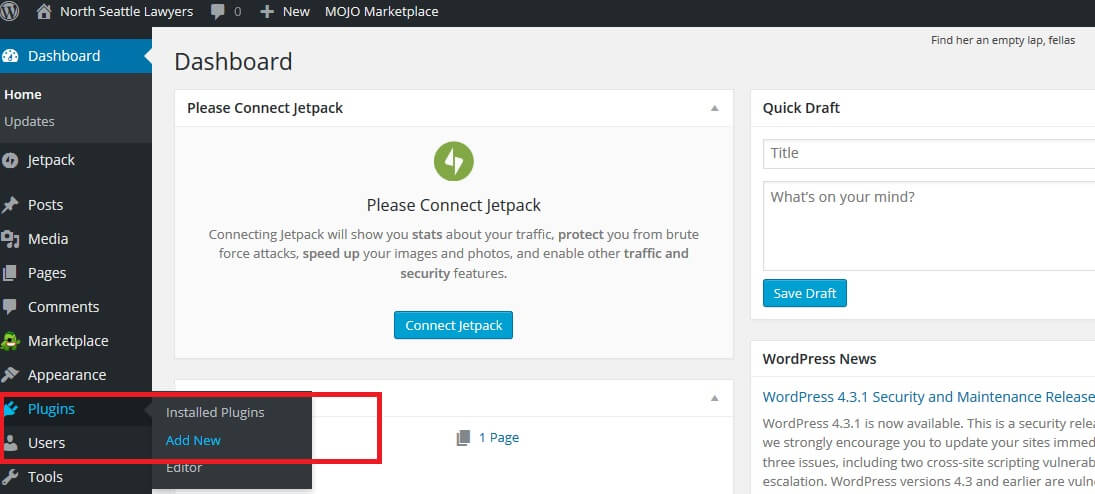
Go to Add New Plugin from the left menu of your dashboard:
Then search for a plugin called Yoast SEO:
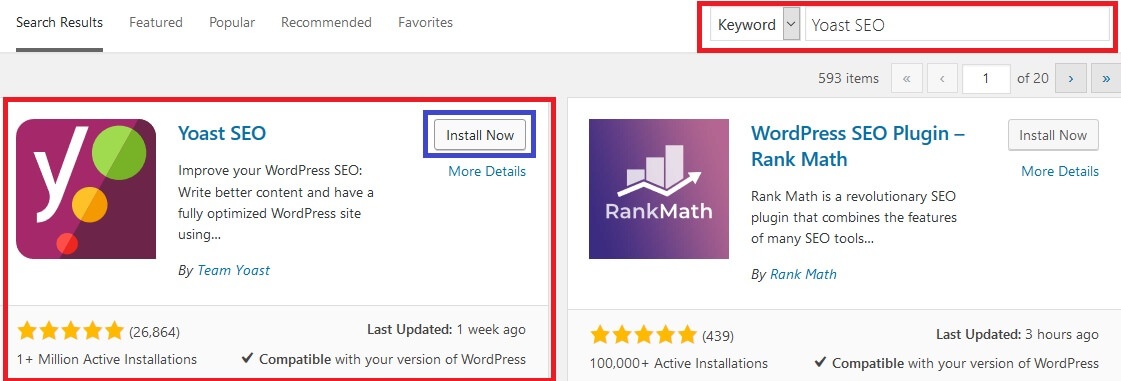
You should see Yoast SEO by Team Yoast and click install now.
After the plugin is installed and activated you should see “SEO” from your left menu inside the website dashboard. Click on it and go to “Search Appearance” and scroll down a little bit. You should see something like this:
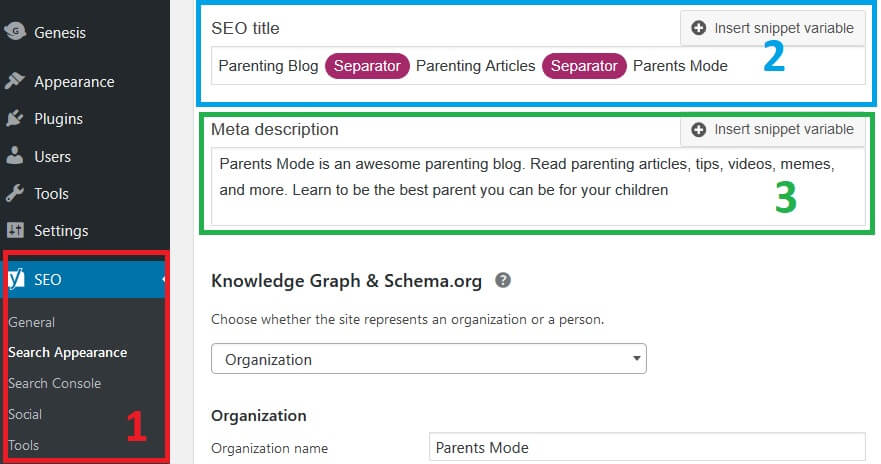
Pay attention to 2 areas:
SEO Title: put your main keyword here
Meta Description: write a description about what your website is about. I suggest you put your main keywords here
There’s a tool to see how your title and description look like on search engines. It’s called Google SERP Optimization Tool by SEOMofo. You can use the tool to make sure your title and description are within the limit allowed by Google.
Once you enter in the SEO Title and Meta Description, click “Save Changes” on the bottom of the page and that’s it!
Yoast SEO installation is complete. Now, every time you post a new blog post or create a new page, Yoast SEO will ask for a “focus keyphrase” for that particular post or page.
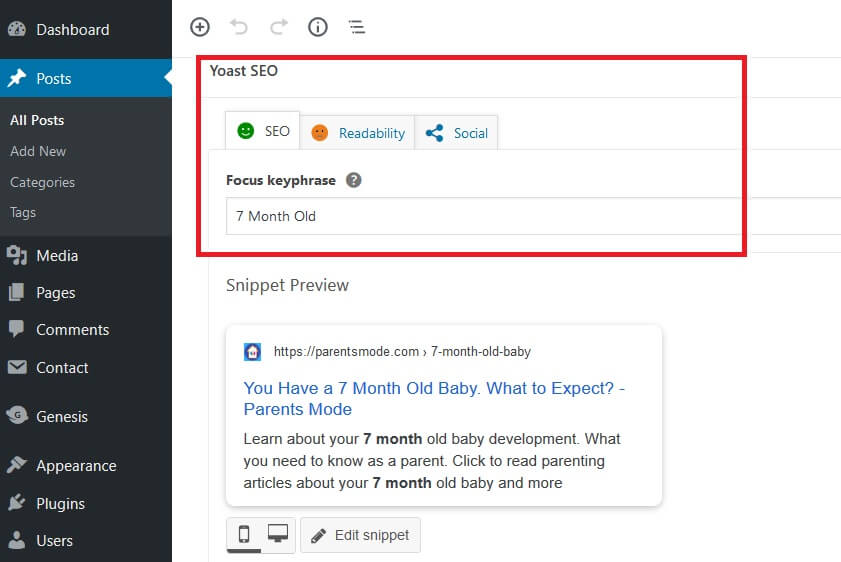
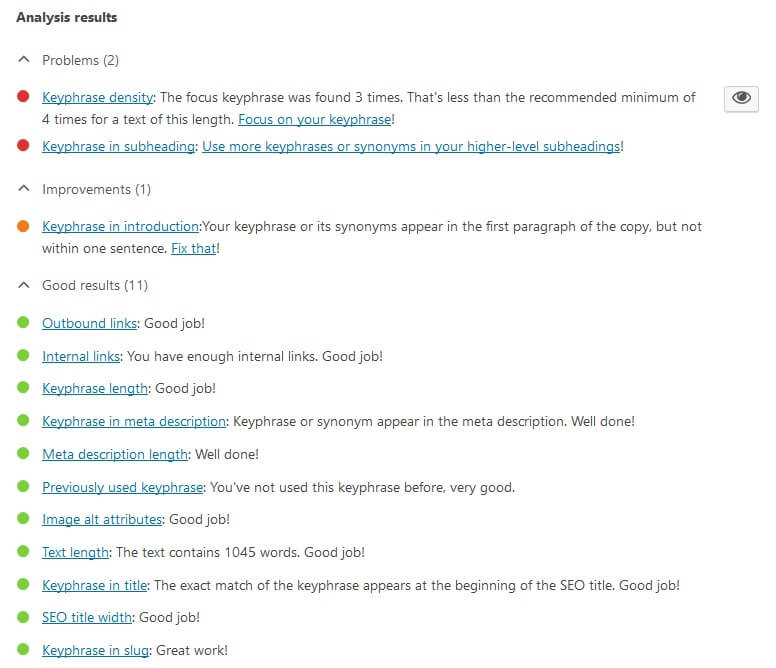
Yoast also analyze your content extensively and tries its best to suggest the best On Page SEO practices so that your content ranks high on search engines.
Step 7: Know Your Sitemap URL
To get your XML Sitemap URL, please follow these steps:
- Click on your Yoast SEO General Settings
- Click on Features tab on top
- Click on the question mark next to XML Sitemaps
- Click on See the XML Sitemap
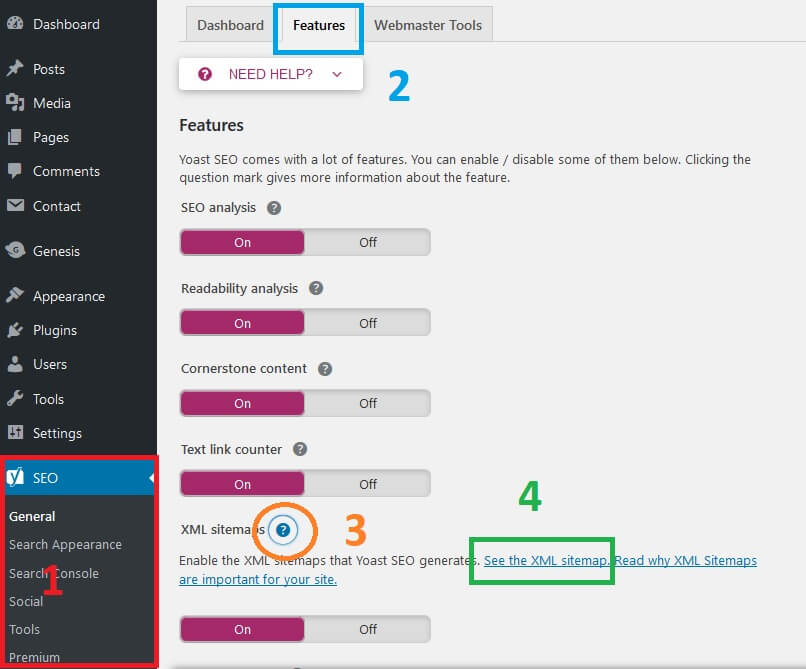
Note: Please remember your XML Sitemap URL, you’re going to need it a little bit later.
Important notes about your XML Sitemap:
- Go to Yoast SEO General Settings to find your XML sitemap URL
- You will need this URL in the next step so please keep it handy
Step 8: Install Google Analytics
So here’s what you do:
Go to https://google.com/analytics and sign in. If this is your first website you must sign up to use this service. Once you’re signed up, enter your website info, click on “GET TRACKING ID” on the bottom and agree to their terms and service:
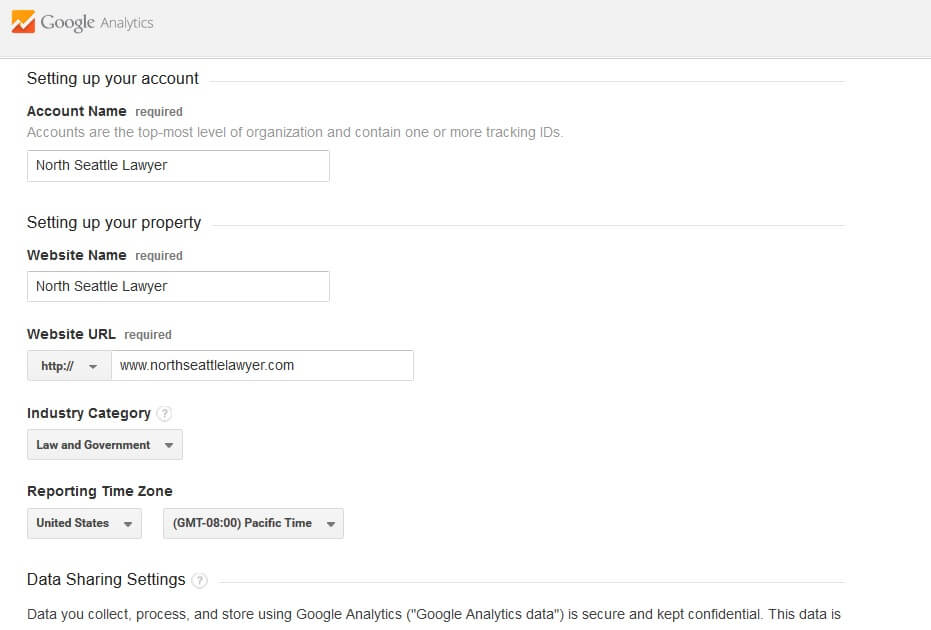
Once you click on “GET TRACKING ID” you will see the ID starts with UA-########-#
You might want to remember how to get this tracking ID for future purposes.
Note: You could copy the UA-xxxxxxxx-x part and save it to a notepad.
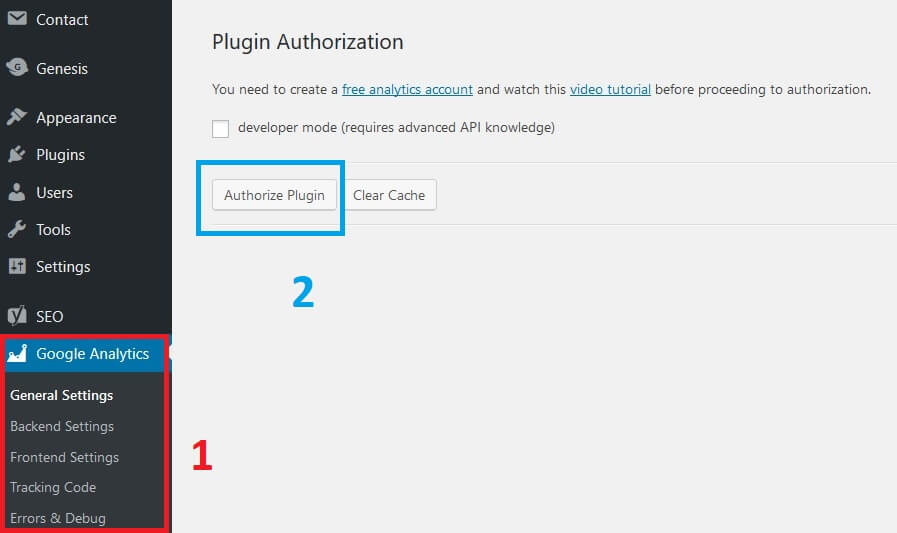
After you install and activate the plugin, go to its General Settings and click on Authorize Plugin.
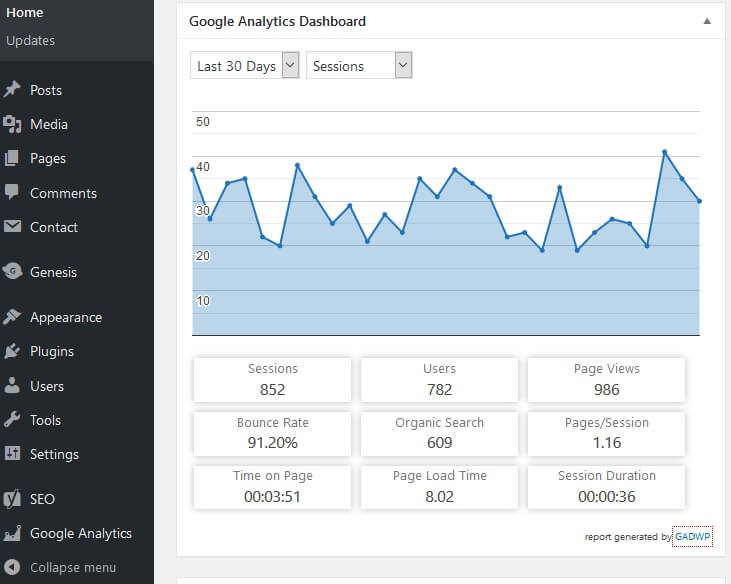
Once you’re done with the set up, you’ll see your traffic data inside your website admin area:
Important notes when installing Google Analytics:
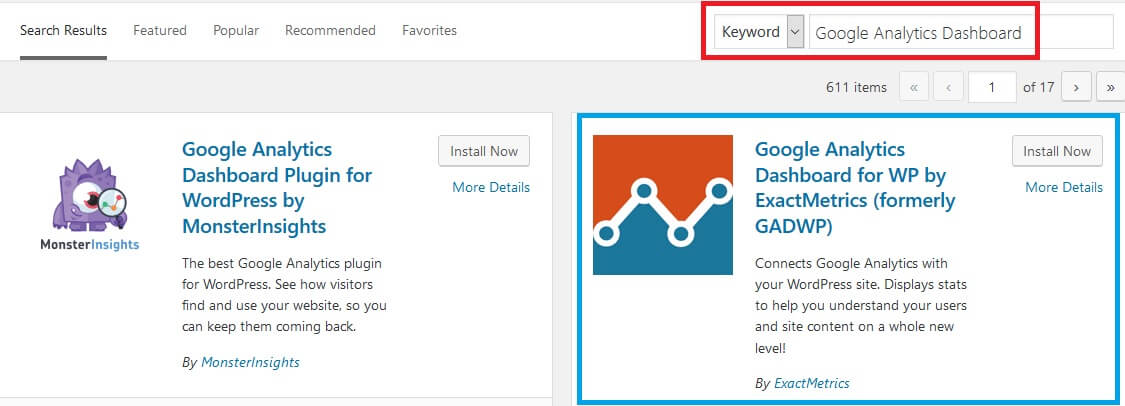
- Register an account with Google Analytics and get your website’s Analytics ID
- Install a WordPress plugin called Google Analytics Dashboard by ExactMetrics. Activate and authorize the plugin to read your Google Analytics account
Important notes when submitting your sitemap:
- Get your XML sitemap URL from Yoast SEO plugin and add your sitemap to Google Webmasters
-
Submit both versions of your website (with www and without www) to Google Webmasters
Step 9: Register to Google
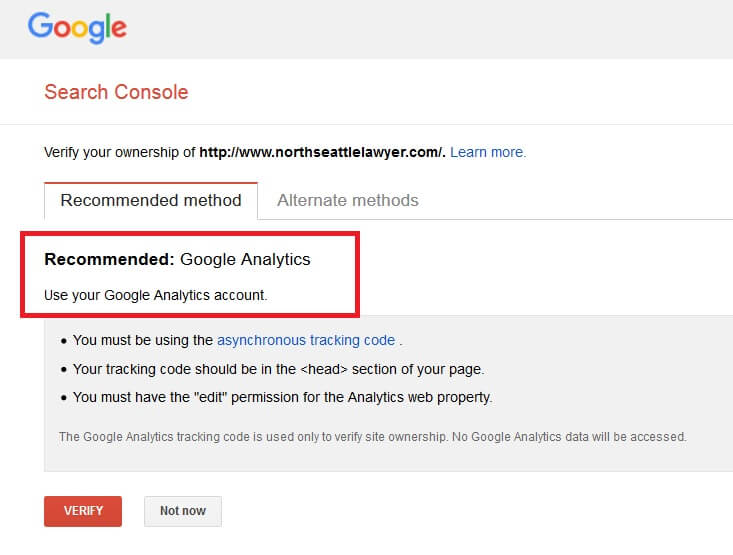
Go to http://google.com/webmasters and login just like you did on Google Analytics. Once you’re logged in you can add your website’s URL inside the webmasters console. Just click verify and you’re done:
Important notes when adding your website to Google Webmasters:
- Use your Google Analytics account to verify your website ownership
- Feel free to use other verification methods to add your website to Google Webmasters
Step 10: Submit sitemap
From your webmaster console click the URL of your site just like this:
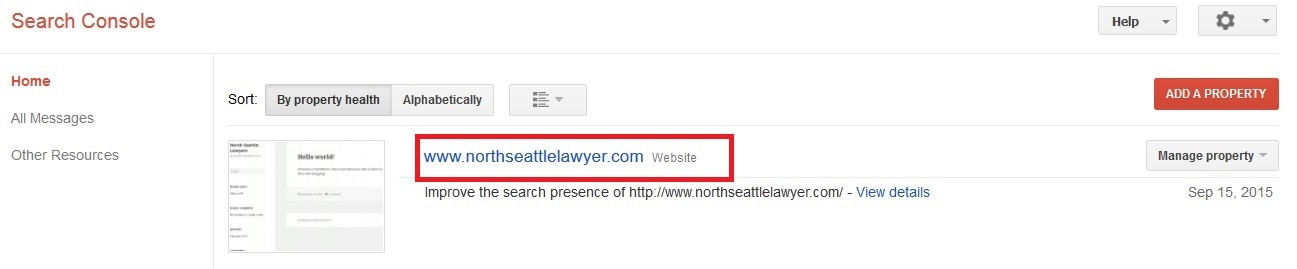
After you click on the URL, you’ll see a page just like this:
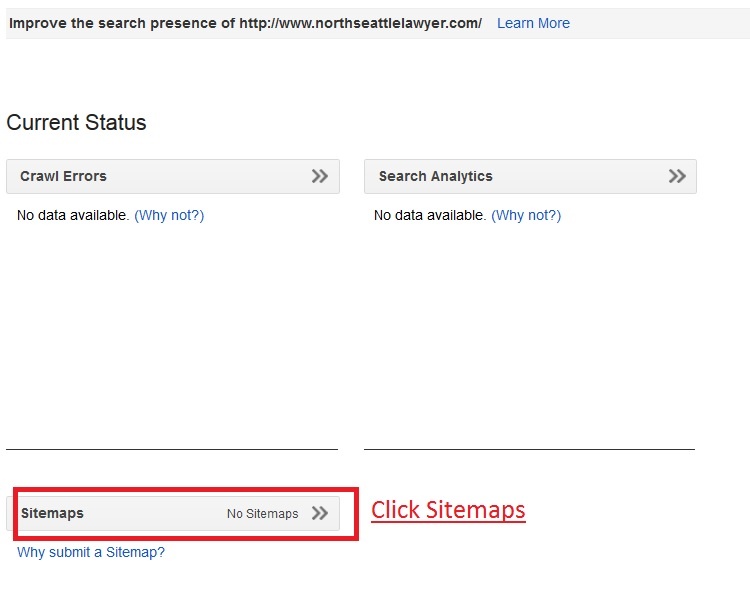
Once you click Sitemaps, it’ll let you to ADD SITEMAP. Click on ADD SITEMAP and enter in the URL from your XML sitemap plugin. Remember, your sitemap URL is inside the Yoast SEO plugin settings (Step 7). Please read that step again if you don’t remember.
After you submit your sitemap, I suggest you repeat step 9 and 10 for your “other” domain. What I mean is, if you register your website using www in step 9 and 10, you should repeat the process without the www this time. The goal is to submit two sitemaps with www and without www in front of your domain.
So on your Google webmaster tool you should see: http://yourdomain.com and http://www.yourdomain.com
And that’s it! You’re done.
Congratulations on your new website! Not as hard as you expected, is it? If you find this information useful please share it with anyone you know who wants to make their own website. If you have questions or comments please leave them below or contact me, I’ll be more than happy to help.
Thanks again for reading!